APPROVAL WORKFLOW ENGINE
Many daily tasks are part of a larger process that involves several steps and people working
together. The term workflow refers to this process, which could surround, for example, the
approval of a purchase orders or a job change request form. To facilitate this type of multiuser
process, the PeopleSoft product can automatically trigger workflow notifications to inform the
next approver in the process of work awaiting them.
The Peoplesoft Approval Workflow Engine (AWE) is the current Peoplesoft standard for
transactions requiring approvals processing.The document will be describing the step-by-step process for registering an HCM transaction in
the AWE.
The Approval Workflow Engine (AWE) is the engine that provides the framework and
capabilities for creating, running, and managing approval processes. The engine uses a series of
database objects combined with application component configuration settings to determine how
to process approvals using workflow.
Approval workflows are triggered when requesters submit a transaction, such as a promotion.
The application hands the transaction over to the Approval Workflow Engine, which finds the
appropriate approval process definition and launches theapproval workflow. A set of approvers then carries out tasks related to the transaction.
For example, the process of submitting a promotion and getting it approved requires defining
who will approve the promotion, the order in which they will approve it, and how it will be
routed to approvers.
All of the steps in approval workflow are defined using PeopleSoft pages rather than
underlyingPeopleCode, so functional users can design and maintain workflow using these online
PeopleSoft pages instead of requiring technical developers to create workflow rules.
Using Approval Framework, you can:
• Approve or deny individual line items in a transaction.• Approve and deny multiple transactions one at a time.• Include multiple approvers for individual steps.• Assign additional approvers and reviewers during the approval process.• Escalate approvals i.e. if for a certain period of time, an approver doesn’t attend to the request
then it should route to the next approver in series.
• Approve, deny, or push back approvals.• Reassign approval tasks to another approvers.• Use worklist and email notifications.
Header vs Line Level AWE
The difference between Header and Line-Level AWE is only related to the Line-level versus
header-level end actions.
Using line-level approvals makes it possible for an action to be taken on different line items
upon their approval, without waiting for the approval of other line items in the requisition. You
can source line items as soon as they are approved.
The Header actions allow the transaction lines to be grouped together and processed as one
unit.
For a purchase order for example, if it contains multiple line items, each line item is treated as a
transaction. Therefore, if you order pens, paper and scissors, you might obtain approval for pens only, and
not for paper and scissors. The denial would not have an impact for the procurement of pens.If treated as a header approval, the entire PO would have been denied.
Header Record
One of the few transaction side requirements of the AWE is the Header Record. The Header
Record should be the highest-level transaction record having a one-to-one relationship with the
transaction.In other words, each transaction that is submitted should have only one row in the Header
Record.
In the following example, SRM_AWE_H_TBL is created, that would be your header record.

EMPLID is the only Key in the record shown above. Similarly, you need to create one header
record.
Cross Reference Record
Another requirement for each adopting applications is the Cross-Reference record. You need to
create one too for your approvals.The cross-reference record is simply a record containing the delivered EOAW_XREF_SBR as
well as all the key fields from the applications header record MARKED AS NON-KEY fields.
For example, using the custom SRM_AWE_H_XRF record:

Unlike the header record, which plays a part in your transaction processing, the cross-reference
record is used solely by the AWE. Your application does not need to retrieve any information
off this record and should never update this record. The AWE uses this record as its only link
between itself and the transaction.
A work record SRM_AWE_H_WRK is created to store button fields. i.e. for Submit, Approve, Deny,
Pushback, etc.
Here the fields, PUSH1_WCB, PUSH2_WCB, PUSH3_WCB, PUSH4_WCB are taken for Submit
Button, Approve, Deny, Pushback buttons respectively.

EOAW_IDS
The EOAW_IDS is a delivered record by Peoplesoft that is the base record that is used to create
some of AWE’s key values. For example, your cross-reference record contains a numeric field called
EOAWTHREAD_ID. Whenever this value is set for a newly instantiated transaction, the engine refers
to the EOAWAW_IDS.EOAWCOUNTER field. The engine retrieves the value, and then increments it
accordingly for the next transaction.
Also below are some Main Setup and Transaction tables for Workflow
S.NO
TABLE NAME
TABLE DESCRIPTION
1
PS_EOAW_PRCS
This table holds the Approval Process definition properties.
Gets populated when we manually configure Approval
Process Setup
2
PS_EOAW_STEP
Approval Step. Gets populated when we manually configure
Approval Process Setup
3
PS_EOAW_PATH
Approval Path Definition. Gets populated when we
manually configure Approval Process Setup
4
PS_EOAW_STAGE
Approval Stage
5
PS_EOAW_STEPINST
Instance of approval step
6
PS_EOAW_USERINST
Step instance assigner to user
7
PS_EOAW_WL
Worklist used for all Approvals
Event Handler
The AWE is designed around a series of specific, pre-defined events. The workflow engine then
uses PeopleSoft Application’s classes in order to allow applications to extend its own
processing. Here is an example of what the delivered Peoplesoft Approval Workflow’s event
handler application package (EOAW_CORE) and its class definition looks like:

You will be required to create your own version of this class, as shown below and use the
same. When you extend the superclass, make sure that your SUB class only contains the
methods that you want to extend as per the customizations you’re required to build in your
workflow.
Once the delivered classes like ApprovalEventHandler, ApprovalManager, LaunchManager
are extended, the application’s sub-class should only include the methods (or properties) that it
wishes to overwrite.
Thread Class
The Thread Class is a delivered application class that relates to what is displayed on the Status
Monitor. The Status Monitor, as shown below, illustrates the approval process flow and up to
date status of the process.

When constructing the status monitor, the AWE uses the Thread keys as the default group box
header.
The delivered threadDescr class allows you to override this default and display something
more meaningful to the user. Also, for each step within an approval process, the administrator
monitor generates a link for viewing additional information related to that user. The default
link text is constructed using the description of the user’s operator id. If an adopting application
wishes to override that functionality, the
can do so by extending the getUserName method in the threadDescr base class.
Here is an example of what the delivered threadDescr class looks like:
Delivered Package Definition:

Delivered Class Definition:
Class threadDescr extends EOAW_MONITOR:MONITOR:threadDescrBase
method threadDescr();method getThreadDescr(&keys As array of Field) Returns string;method getWorklistDescr(&recApplication As Record) Returns string;
method getUserName(&OprId as String) Returns string
end-class;
Email Approvals
If you wish to allow users to approve transactions straight from the email notification that they
receive, you need to use the Email Collaboration Framework, which is an another delivered
functionality.
Steps to configure a Header Level Approval Workflow Engine.
After setting up the header record along with the cross reference and derived work as shown above,
we design a standard page with the header record at level 0 and line record at level 1 as shown below and
including the delivered sub-page EOAW_MON_SBP to this page for displaying the Approval status
monitor.A comment box is added to store the user’s, approvers comments while performing any action, that will
be visible in the workflow generated. 
Further, a custom Application Package SRM_AWE_H_PKG is created, with custom application class
approvaleventhandler inside it.
You need to create an application package with an application class inside it in the same way and add the
following code “on execute” event of the same class, replacing the header record name which is shown in
the demo with the name of the header record created by you previously, along with its key fields and non-
key fields.

/******************* CODE: ***********/
import EOAW_CORE:ApprovalEventHandler;
import EOAW_CORE:ENGINE:AppInst;
import EOAW_CORE:ENGINE:UserStepInst;
import EOAW_CORE:ENGINE:StepInst;
import EOAW_CORE:ENGINE:Thread;
class approvaleventhandler extends EOAW_CORE:ApprovalEventHandler
method approvaleventhandler();
method OnProcessLaunch(&appinst As EOAW_CORE:ENGINE:AppInst);
method OnStepComplete(&stepinst As EOAW_CORE:ENGINE:StepInst);
method OnHeaderApprove(&appinst As EOAW_CORE:ENGINE:AppInst);
method OnHeaderDeny(&userinst As EOAW_CORE:ENGINE:UserStepInst);
privateinstance Record &HeaderRecord; /** Declare Record Instance **/
end-class;
/** Constructor */method approvaleventhandler
/+ Extends/implements EOAW_CORE:ApprovalEventHandler.ApprovalEventHandler +/
%Super = create EOAW_CORE:ApprovalEventHandler();&HeaderRecord = CreateRecord(Record.SRM_AWE_H_TBL); /** Set the Header Record **/
end-method;
method OnProcessLaunch/+ &appinst as EOAW_CORE:ENGINE:AppInst +//+ Extends/implements EOAW_CORE:ApprovalEventHandler.OnProcessLaunch +/; /** Set
Approval Prcoess **/
Local string &HdrRecTopKeyValue;
&appinst.thread.SetAppKeys(&HeaderRecord);
&HeaderRecord.SelectByKey();
/** Retrieve Header field values **/&HdrRecTopKeyValue = &HeaderRecord.GetField(Field.EMPLID).Value;
/** Update the Workflow Status **/Local Record &recHdrRecord = CreateRecord(Record.SRM_AWE_H_TBL);
&recHdrRecord.GetField(Field.EMPLID).Value = &HdrRecTopKeyValue;If &recHdrRecord.SelectByKey() = True Then
&recHdrRecord.GetField(Field.APPROVAL_STATUS).Value = "P"; /** Set InApproval Process **/
&recHdrRecord.Update();GetLevel0().Refresh();
End-If;
end-method;
method OnStepComplete/+ &stepinst as EOAW_CORE:ENGINE:StepInst +//+ Extends/implements EOAW_CORE:ApprovalEventHandler.OnStepComplete +/
Local string &HdrRecTopKeyValue;
&stepinst.path.thread.SetAppKeys(&HeaderRecord);
&HeaderRecord.SelectByKey();
/** Retrieve Header Key field values **/&HdrRecTopKeyValue = &HeaderRecord.GetField(Field.EMPLID).Value;
/** Update the Workflow Status **/Local Record &recHdrRecord = CreateRecord(Record.SRM_AWE_H_TBL);
&recHdrRecord.GetField(Field.EMPLID).Value = &HdrRecTopKeyValue;If &recHdrRecord.SelectByKey() = True Then
&recHdrRecord.GetField(Field.APPROVAL_STATUS).Value = "U";
&recHdrRecord.Update();
GetLevel0().Refresh();
End-If;
end-method;
method OnHeaderApprove/+ &appinst as EOAW_CORE:ENGINE:AppInst +//+ Extends/implements EOAW_CORE:ApprovalEventHandler.OnHeaderApprove +/
Local string &HdrRecTopKeyValue;
&appinst.thread.SetAppKeys(&HeaderRecord);
&HeaderRecord.SelectByKey();
/** Retrieve Header field values **/&HdrRecTopKeyValue = &HeaderRecord.GetField(Field.EMPLID).Value;
/** Update the Workflow Status **/Local Record &recHdrRecord = CreateRecord(Record.SRM_AWE_H_TBL);
&recHdrRecord.GetField(Field.EMPLID).Value = &HdrRecTopKeyValue;If &recHdrRecord.SelectByKey() = True Then
&recHdrRecord.GetField(Field.APPROVAL_STATUS).Value = "A";
&recHdrRecord.Update();GetLevel0().Refresh();
End-If;
end-method;
method OnHeaderDeny/+ &userinst as EOAW_CORE:ENGINE:UserStepInst +//+ Extends/implements EOAW_CORE:ApprovalEventHandler.OnHeaderDeny +/
Local string &HdrRecTopKeyValue;
&userinst.thread.SetAppKeys(&HeaderRecord);
&HeaderRecord.SelectByKey();
/** Retrieve Header field values **/&HdrRecTopKeyValue = &HeaderRecord.GetField(Field.EMPLID).Value;
/** Update the Workflow Status **/Local Record &recHdrRecord = CreateRecord(Record.SRM_AWE_H_TBL);
&recHdrRecord.GetField(Field.EMPLID).Value = &HdrRecTopKeyValue;If &recHdrRecord.SelectByKey() = True Then
&recHdrRecord.GetField(Field.APPROVAL_STATUS).Value = "D";
&recHdrRecord.Update();GetLevel0().Refresh();
End-If;
end-method;
Permission Lists Definitions (Maintain Permission Lists)
Permission Lists are directly related to Peoplesoft Security. We assign a set of permission lists to
our pages, components and menus to make them appear for some of the desirable users only.
Record
Description
PSCLASSDEFN
Permission lists are where the security really happens. They provide
access to menus, components and pages and a host of other security
including People Tools, Process security, Component Interfaces, Web
Libraries, Web Services, Personalisations, Query and Mass Change.
PSAUTHITEM
The link between permission lists and menus.
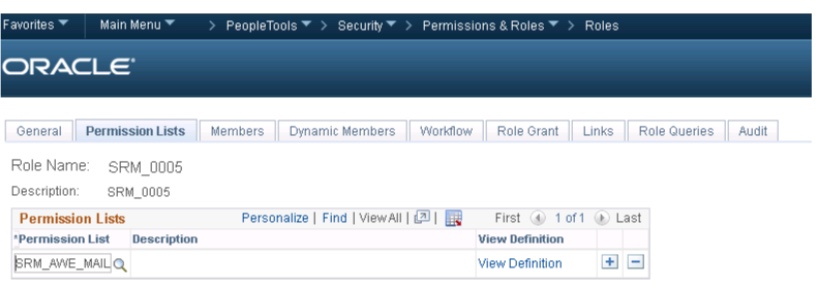
Creating a permission list for our page. Users with the role belonging to the same permission list will be
able to view the page.

Registering our page and giving a proper security to our page by assigning it with a custom permission
list.

Role Definitions (Maintain Roles)Roles are used by PeopleSoft to implement security. A role is way of grouping one or more
Permission Lists and assigning them to a particular user.
This PeopleSoft application delivers a set of default user-list roles corresponding to the levels
within an organization, such as EMPLOYEE, MANAGER, and VICE PRESIDENT.
Record
Description
PSROLEDEFN
Stores roles and their properties. Roles can be assigned dynamically
through Query, PeopleCode or LDAP. Roles are also used in conjunction
with Workflow and routing.
PSROLECLASS
Roles are made of up of one or permission lists, and this table links the
two together. Very handy.
Adding Permission List to a Role:
-
Search and open the desired role in the Roles component and go to the Permission Lists tab.
-
In the Permission Lists grid, add the name of the permission list that should be assigned to
the role.
-
Save the component.
Roles and Permissions lists share a many to many relationships. A single role can have multiple
permission lists and a permission list can be assigned to several different roles.
Creating appropriate Roles for different levels of steps in the Approval Process and mapping them with the
permission lists, created as shown above.


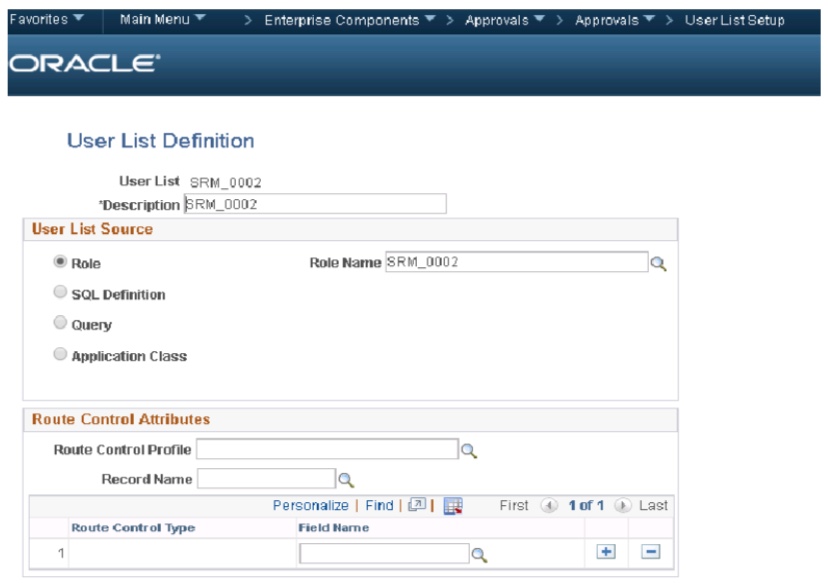
User Lists Definitions (Maintain User Lists)
User List object definitions are pieces of logic that, when instantiated at runtime, return a list of
PeopleSoft operator IDs.Userlists are used primarily to define who the system needs to route a transaction to at the Step
level of an Approval Process Definition. Userlists may also be used on the Configure
Transactions page as well.
There are four types of User Lists you can define to help the system resolve who the next
approver is for a given transaction.
-
Role – The system will return all the users in the specified role to the engine at runtime.
For example, you want all Address Change requests to go to the role of HR
Administrator for approval in which case anyone in that role will receive notification of
the transaction.
-
SQL Definition – You need to enter SQL Object name they have created through
Application Designer. The SQL Object must select OPRID in its select statement.
-
Query – You need to enter Query Name they have created through Application
Designer. As with the SQL Definition, the Query must select OPRID in its select
statement. If you are creating the query in the Query Manager component, you must set
the Query Type value of the query to Process. Setting the Query Type value to User can
cause an error.
-
Application Class – You need to provide Application Package Name and Application
Class name. The application class must Extend the EOAW_CORE:Defn:UserListBase
Class.
Creating a set of User Lists and associating some of the users as members to them.


Registering Transactions in AWE
Once you have created and defined all the required objects as described, you must now register your
transaction in the AWE’s approval transaction registry. You must create a unique approval process
ID for each transaction.
Navigation: Main Menu - Enterprise Components – Approvals – Approvals – Transaction
Registry.
The following is the detailed information of this Register Transactions page.


Process ID (Approval Process ID) – This is a unique approval process identifier for the
transaction. This unique identifier needs be passed in when AWE is invoked by the transaction.
Description – The description of this unique approval process identifier for the transaction.
Object Owner ID – The owner ID of this specific transaction.
Cross Reference Table – This table is required and it consists of two parts: a sub record
EOAW_XREF_SBR and key fields of an application transaction.
Enable Notifications – This notification option is applied at the transaction level. It determines
whether the transaction allows notifications or not. There are four different notification options:
Email, Worklist, Both or None. The latter section of the document carries how to use email
templates and send notifications.
Use Email Approvals – If this box is checked, then an HTML email with an enclosed form will
be generated and sent to a recipient. The recipient can take an action on the transaction within
the email itself without having to log into the system.
Default Approval Component
Menu Name/ Approval Component – This is the default approval location for your transaction.
It identifies the default component that users should go to when selecting a worklist entry or in
other words where the user must go to in order to approve the transaction.
Approval Event Handler ClassRoot Package ID/Path – Use these two fields to point to the location of your approval event
handler class as described in the Event Handler.
Transaction Approval LevelsLevel – Select Header or Line, which determines the levels that are enabled by the application for
approvals. The first row will always be the header level.
Record Name- Select your header record name in the row that you marked as “Header” level
and your line level record name in the row you marked as “Line”.
Level Record Key Field Label IDs – When you define the record names for each level in your
transaction, the Level Record Key Field Label IDs section is automatically populated with the
key fields from each of the records you defined. You select from the list of available field label
IDs for the AWE to use for them.
Transaction Configurations in AWE
The transaction is registered, you need to set the configuration options for the transaction now.
The following is the detailed information for the Configure Transactions page.
Navigation: Main Menu - Enterprise Components – Approvals – Approvals – Transaction
Configuration.


Events
The events section of the Configure Transactions page is used for setting up notifications for
your transaction.
Header or Line – Select the level at which an event occurrence will trigger the notification.
Event – Select the event for triggering the notification.
On Final Approval - When the final step in an approval process is approved.
On Final Denial - When the final step in an approval process is denied.
On Process Launch - When an approval process is launched (i.e. a transaction is first submitted).
Push Back - When a step is pushed back to the previous step in the approval chain.
Route for Approval - Anytime the transaction is routed to an approval step.
Menu Name – The default menu that is used when creating the link that will be embedded in
your email notification.
Approval Component – The default component that is used when creating the link that will be
embedded in your email notification.
Page Name - The default page that is used when creating the link that will be embedded in
your email notification.
SQL Object Identifier – The default SQL Object that will be used to populate the binds in your
email notification template.
Participant – Select the Participant for whom you want the notification to be sent. Approvers
Any approvers associated with the particular step for which the event has been triggered.
Requester - The person who requested the transaction.Reviewers - Any reviewer associated with the particular step for which the event has been
triggered.Channel – Select the type of notification to be sent.
Template Name – If Email or Both is selected as the Channel, then select the email template
name that should be used in the email notification.
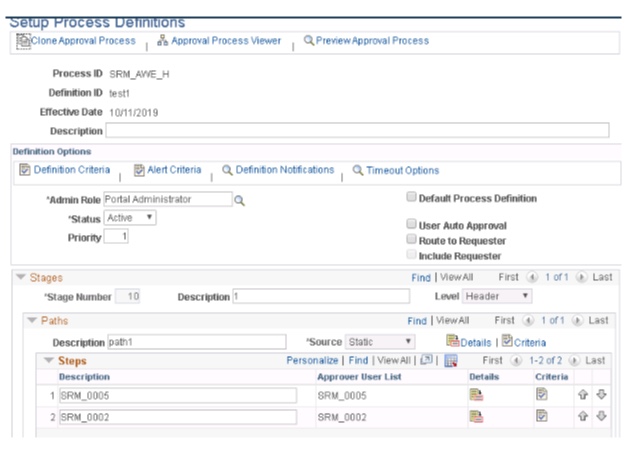
Setup Process Definitions
Under Setup Process Definitions, you will define one or more process definitions for each of your
transactions. You will be defining the number of stages, paths, and steps required for your process
definition created above.
In addition, you can define criteria that the AWE will use to determine which process
definition, path, or step to use at run time.
Navigation: Main Menu - Enterprise Components – Approvals – Approvals – Approval
Process Setup.

Approval Process Viewer – The approval process viewer displays an Adobe SVG Viewer
interpretation of the selected approval process definition. This tool is used simply to create a
more user-friendly display of the current approval process.
Process ID – The approval process ID as defined in the Register Transactions page.
Definition ID – The name of the approval process that was determined upon entry to this
component.Effective Date – The effective date of this approval definition ID.

Admin Role – This is the approvals administrator for this approval definition.
Status – This is the effect.
User Auto Approval – An approver may appear more than once in the same approval process.
If “User Auto Approval” checkbox is turned on, then this approver’s action will be remembered
and automatically reapplied whenever this approver appears again in the approval chain of the
transaction.
Route to Requester – If the Requester or Submitter of the transaction also appears as an
approver on anysubsequent steps in the approval process, the Route to Requester flag set to “on” will require
that he/she take action on those steps.
If the Route to Requester flag is set to “off”, he/she will be skipped from performing action on
those steps.
If self-approval is set up, the criteria to trigger self-approval is not met, and route to requester is
not selected, then the requester can't be included as part of the approval path.
Stages / Paths / Steps
Stages – A stage is a high-level grouping of approval paths. Paths within the same stage are
carried out in parallel. In order to achieve sequential path processing, paths need to belong to
separate stages.
Paths – Approval Paths are logical groupings of approval steps. Again, paths belonging to the
same stage are carried out in parallel.
Escalate Options – There are three escalation actions that you can choose from: Advance
Approval, Notify Participant, or Reassign Approval.
Escalation Option Description in Approval Path Definition
Advance Approval - Pushes the approval to the next step in the path. If a user list is specified,
those users will be notified.Notify Participant - Will send a notification to the participant generated by the corresponding
user list
Reassign Approval - Will reassign the step to the participant generated by the corresponding
user list.
Self-Approval – In the case where the approver for this step is also the requester of the
transaction, if thisflag is checked, then the step will be skipped. In other words, the step assumes approval since
the approver is the one who created the transaction.You can establish a criterion that controls the requester's approval authority by using the Self-
ApprovalCriteria link. If the associated criteria evaluate to true, then self-approval is acceptable.
Criteria Definitions
Criteria Definitions are used to define bits of logic that, at runtime, are evaluated for a Boolean
result (True or False).The areas in which you may set up criteria definitions include at the process definition, alerts,
path and step levels. From a functional standpoint, criteria may be used to determine for
example which approval process definition ID to use for a given transaction. Or to determine
when to show the user a message about the transaction he/she is trying to submit for approval.
For example, you may want employees based out of Europe earning more than Rupees 100,000 per year
to have only one level of approval for submitted promotion requests whereas for all employees in the
INDIA you want three levels of approval for any submitted promotion request. Any criteria evaluation is
possible as long as the appropriate fields exist in your header record.
Criteria Type 1 – Always True – Always true simply means that whenever the system
evaluates this criterion it will always return a ‘True’ to the engine.
Criteria Type II – Application Class – Allows you to define an application class to be executed
at the time the criteria are evaluated.
Criteria Type III – User Defined – The User Defined criteria type allows you to set up rules
based on the fields that exist on the header record of your transaction and delivered operands.
Monetary Criteria – Use the monetary criteria section to define criteria logic for monetary fields
only. The system displays this section when you select the Criteria Type value of User Entered.
Use this section to establish approval criteria based on a value or amount.
Alert Criteria – With the criteria object defined, you can then evaluate the criteria to determine
if a message should be displayed on the approval page.
After completing the process on the interface’s end, coming back to our page’s project in the application
designer. And adding some necessary codes to it.
Component Post Build Code.
Note: You will be needed to replace
-
the demo’s Process ID with your process ID created,
-
the Definition ID with your Process Definition Created in the Approval Process Setup Section,
-
the header record with your header record.
/**** AWE Post Build Code* Application developers should instantiate ApprovalManager & LaunchManager class as a
component-scoped variable.* The best place to initialize ApprovalManager & LaunchManager class is in the component post-build
event.
***/
/** Import Approval Framework Base Classes **/
import EOAW_CORE:LaunchManager;import EOAW_CORE:ApprovalManager;
/** Declare functions*/Declare Function createStatusMonitor PeopleCode EOAW_MON_WRK.EOAW_FC_HANDLER
FieldFormula;
/** Declare Variables **/Component EOAW_CORE:LaunchManager &c_aweLaunchManager;Component EOAW_CORE:ApprovalManager &c_aweApprovalManager;Component string &c_sAppr_Action;Component string &c_AWEProcessDefnID;Component Record &headerRec; /** We have set it Component Level, So Get Acess to Others
Component **/Local boolean &isApprover = False; /** Checl if User is Approver for this transaction **/
/** Set Header Record, **/&headerRec = GetRecord(Record.SRM_AWE_H_TBL); /** HEADER RECORD **/
/** Get Assigned Approval Process Id for selected transaction From Workflow Transaction Page **/
&c_AWEProcessDefnID = "SRM_AWE_H"; /** PROCESS ID **/
/** Initialize the launch and approval managers. ApprovalManager will need reinitialization on
submit */&c_aweLaunchManager = create EOAW_CORE:LaunchManager(&c_AWEProcessDefnID,
&headerRec, %UserId);
&c_aweApprovalManager = create EOAW_CORE:ApprovalManager(&c_AWEProcessDefnID,
&headerRec, %UserId);
/** Set Up Approval Process Defination **/
&c_aweLaunchManager.definition = "test1"; /** DEFINITION ID **/
/** Show Transaction Status Monitor & Save & Submit Button **/
If &c_aweApprovalManager.hasAppInst Then
createStatusMonitor(&c_aweApprovalManager.the_inst, "A", Null, False);
SRM_AWE_H_WRK.PUSH1_WCB.Visible = False;
End-If;
/*** Show Approve & Deny Button Based on Condition ***/
If &c_aweApprovalManager.hasPending And
&c_aweApprovalManager.GetParticipant(%UserId) = "AA" Then
SRM_AWE_H_TBL.APPROVAL_STATUS = "U";
SRM_AWE_H_WRK.PUSH2_WCB.Visible = True;
SRM_AWE_H_WRK.PUSH1_WCB.DisplayOnly = False;
SRM_AWE_H_WRK.PUSH3_WCB.DisplayOnly = False;
SRM_AWE_H_WRK.PUSH2_WCB.DisplayOnly = False;
SRM_AWE_H_WRK.PUSH3_WCB.Visible = True;
SRM_AWE_H_WRK.PUSH1_WCB.Visible = False;
ElseSRM_AWE_H_WRK.PUSH4_WCB.Visible = False;
SRM_AWE_H_WRK.PUSH2_WCB.Visible = False;
SRM_AWE_H_WRK.PUSH3_WCB.Visible = False;
End-If;/*** Show Approve & Deny & Save & Submit Button Based on Condition End ***/
Component Save Post Change Code.
/**** AWE SavePostChange Code* This Save Post Change Code Will Handled When Submit, Approve & Deny Action Performed
**/
/** Import Approval Framework Base Classes */
import EOAW_CORE:LaunchManager;import EOAW_CORE:ApprovalManager;
/** Declare functions*/Declare Function createStatusMonitor PeopleCode EOAW_MON_WRK.EOAW_FC_HANDLER
FieldFormula;
Component EOAW_CORE:LaunchManager &c_aweLaunchManager;
Component EOAW_CORE:ApprovalManager &c_aweApprovalManager;
Component string &c_sAppr_Action;Component string &c_AWEProcessDefnID;Component Record &headerRec; /** We have set it Component Level, So Get Acess to Others
Component **/
Local boolean &IsActionTaken = True;Local string &sActionMsgString = "";&comment = SRM_AWE_H_WRK.COMMENT1.Value;
Evaluate &c_sAppr_ActionWhen "V"
/* When Data Saved As Draft */
Break;
When "S"
/* Call DoSubmit, passing in current header info. ;*//** It is always safe to call this method (as long as the header record being passed in is valid!), */
&c_aweLaunchManager.SetHeader(&headerRec);rem try;
If &c_aweLaunchManager.hasAppDef ThenIf &c_aweLaunchManager.submitEnabled Then
&c_aweLaunchManager.DoSubmit();
End-If;
End-If;
/* catch Exception &Ex1&sActionMsgString = "Unable to DoSubmit on the ApprovalManager." | Char(10) | " Error - " |
&Ex1.DefaultText;
&IsActionTaken = False;
end-try; */If (&c_aweLaunchManager.hasAppInst) Then
/** Initialize Approval Manager if transaction was submitted */
&c_aweApprovalManager = create
EOAW_CORE:ApprovalManager(&c_aweLaunchManager.txn.awprcs_id, &headerRec, %UserId);
&c_aweApprovalManager.AddComments(%UserId, &headerRec, &comment);
/*For Requester’s Side.*/
UnHide(SRM_AWE_H_TBL.APPROVAL_STATUS);
SRM_AWE_H_TBL.APPROVAL_STATUS.Value = "P";
End-If;
Break;
/*For Approver’s Side.*/
When "A"/* Call DoApprove, passing in current header info. */
try
&c_aweApprovalManager.DoApprove(&headerRec);
catch Exception &Ex2
&sActionMsgString = "Unable to DoApprove on the ApprovalManager." | Char(10) | " Error - " |
&Ex2.DefaultText;
&IsActionTaken = False;end-try;
&c_aweApprovalManager.AddComments(%UserId, &headerRec, &comment);
Break;
When "D"/* Call DoDeny, passing in current header info. */
try
&c_aweApprovalManager.DoDeny(&headerRec);
&c_aweApprovalManager.AddComments(%UserId, &headerRec, &comment);
catch Exception &Ex3&sActionMsgString = "Unable to DoDeny on the ApprovalManager." | Char(10) | " Error - " |
&Ex3.DefaultText;
&IsActionTaken = False;
end-try;
Break;
When "P"
/* Call DoPushback, passing in current header info. */
try
&c_aweApprovalManager.DoPushback(&headerRec);
&c_aweApprovalManager.AddComments(%UserId, &headerRec, &comment);
catch Exception &Ex4&sActionMsgString = "Unable to Dopushback on the ApprovalManager." | Char(10) | " Error - " |
&Ex4.DefaultText;
&IsActionTaken = False;
end-try;
Break;
When-Other
&sActionMsgString = "Error - Invalid Action.";
&IsActionTaken = False;
End-Evaluate;
/** Show Specified Action Message Box **/
If &sActionMsgString <> " " And
&IsActionTaken = False Then
MessageBox(0, "", 0, 0, &sActionMsgString);
/* Exit message processing. */Exit (0);
End-If;
/** Show Transaction Status Monitor & Save & Submit Button **/
If &c_aweApprovalManager.hasAppInst Then
createStatusMonitor(&c_aweApprovalManager.the_inst, "D", Null, False);
SRM_AWE_H_WRK.PUSH1_WCB.Visible = False;
SRM_AWE_H_WRK.PUSH2_WCB.Visible = False;
SRM_AWE_H_WRK.PUSH3_WCB.Visible = False;
SRM_AWE_H_WRK.PUSH4_WCB.Visible = False;
/* Toggle all fields with the exception of the status monitor as display only. We cannot
change the page property as the status monitor fields would be disabled */
Local Rowset &Rs = GetLevel0();
For &i = 1 To &Rs(1).RecordCount
&Rec = &Rs(1).GetRecord(&i);
For &j = 1 To &Rec.fieldcount
&Rs(1).GetRecord(&i).GetField(&j).DisplayOnly = True;
End-For;
End-For;
End-If;
/* Reset &Action to Null */
&c_sAppr_Action = " ";
Note: The AddComments method from the delivered ApprovalManager class is called to add important
remarks/comments in the comment box section that we had already added on our page.
Submit Button Code.
/** Submit Button **/
Component string &c_sAppr_Action;
Component string &c_sSubmitBtn;
&c_sAppr_Action = "S";
If ( Not GetRow().IsChanged) Then
/** force save processing **/
SetComponentChanged();
End-If;
DoSave();
&c_sSubmitBtn = "Y";
Page.SRM_AWE_H_PG.DisplayOnly = True;
Approve Button Code.
/** Approve Button **/
Component string &c_sAppr_Action;
&c_sAppr_Action = "A";If ( Not GetRow().IsChanged) Then
/** force save processing **/
SetComponentChanged();
End-If;
DoSave();
Page.SRM_AWE_H_PG.DisplayOnly = True;
Deny Button Code.
/** Deny Button */
Component string &c_sAppr_Action;
&c_sAppr_Action = "D";If ( Not GetRow().IsChanged) Then
/** force save processing **/
SetComponentChanged();
End-If;
DoSave();
Page.SRM_AWE_H_PG.DisplayOnly = True;
Pushback Button Code.
/** Pushback Button */
Component string &c_sAppr_Action;
&c_sAppr_Action = "P";If ( Not GetRow().IsChanged) Then
/** force save processing **/
SetComponentChanged();
End-If;
DoSave();
Page.SRM_AWE_H_PG.DisplayOnly = True;
Now coming to the page, we designed on the PIA interface, once again to test the functionality.
The user will be requesting for an amount value to be approved.


The request then comes to the approver in the list to which the approver can take his/her desirable actions.
Request approved, push backed or denied is shows as below.


Note: Pushback can’t be occurred at the first level.The second approver in the chain will be push backing the request to the previous approver
located at one step back in the line.


LINE LEVEL APPROVALBUSINESS BENEFITS OF LINE LEVEL APPROVAL:
In line level approval, multiple approvers can be included for individual steps
Each item can be routed to different approvers, based on certain criteria.
Denial /Approval of one-line item does not affect the other.
Most of the steps in line level are same as Header level approval. Let us see a sample workflow
process using line level approval.
SAMPLE TEST CASE:
An employee tries to submit different items (Laptop and Desktop) based on the asset id. Each item is
routed to different approvers and the approver can approve only the specific items routed to him/her.
A component has to be created for the employee to submit the asset items and for the managers
to approve/deny them. Let’s see the process step by step.
Steps to configure a Line Level Approval Workflow Engine.
Step 1: Create a top-level header record ASSET_ID as key-field. Also, create a line record with
ASSET_ID and ITEM_NAME as keys. For header level approval, only the header record is enough.
Header Record: SRM_M_AWE2_HDR
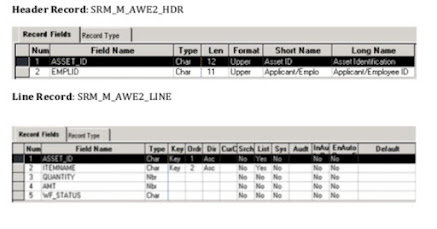
Step 2: Create a cross reference record with the key-fields used in header and line record as non-keys here
to link the workflow process to PIA. Include the EOAW_XREF_SBR delivered sub-record in this record
for getting the thread values.
Reference Record: SRM_M_AWE2_XREF

Step 3: Design a standard page with the header record at level 0 and line record at level 1 as shown below.
Include the delivered sub-page EOAW_MON_SBP to this page for displaying the Approval status
monitor.

Step 4: Create a new component with the header record as search record. Place the page in this component
and register the component to a menu.
Step 5: Give the appropriate permission lists and security access to the component.
Step 6: Coming to the PIA configuration, navigate to
Main Menu -> Enterprise Components -> Approvals -> Approvals -> Transaction Registry.
Add a new Process ID and specify the cross reference, header and line level record names as shown below.
Create a new application package and a class and include it here. The coding for app package is
mentioned later.

Step 7: Create generic templates for submission, approval and denial etc. by navigating to
Main Menu -> Peopletools -> Workflow -> Notifications -> Generic Templates.
The emails triggered to the requester and approver will be in the format of this template
created. Create a SQL to fetch the bind values mentioned in the template. Like the approval
template shown below, similarly create a template for submission and denial mails etc.
This step is needed only if business requires notifications to be sent, else creation of generic
templates is optional.
Step 8: Navigate to
Main Menu -> Enterprise Components -> Approvals -> Approvals -> -> Transaction
Configuration
Here, add the following four events mandatories:
A. On Process Launch (Header level)B. On Final Approval (Line Level)C. On Final Denial (Line Level) D. Route for Approval (Line Level)


If generic templates had been created earlier step, then mention those names here to each event
respectively, but this is not mandatory.

Step 9: Navigate to
Main Menu -> Enterprise Components -> Approvals -> Approvals -> Approval Process Setup.
Add a new Definition ID for the Process id created.

A. The checkbox Take Action on Line Completion gets automatically checked for line level
approval.
B. Approver User list can be created by mapping it to a specified role or Application Package,
SQL or Query. The approval of submitted transactions are based on certain criteria.
C. Stage is a collection of paths and can be at header level or line level. As level here, specify line
level is being used here, create 3 paths.
D. A path is a collection of steps and since we have 2 items here. Once a transaction is being
submitted, it will route to two different approvers as shown above.
Laptop Or
Desktop
E. Click on the Definition Criteria and Alert Criteria links and give it as always true. In all the
two path level criteria, mention the criteria as “User Entered” and enter the record field value
which must be considered for approving.

In the above screenshot, the value is entered as “L” which stands for Laptop. So, the User list
mapped to this value can approve only Laptop transactions. Similarly, for Desktop, criteria is
added and value is given as “D”.
Step 10: In the backend, the coding in work record buttons Field Change and the Component Post Build,
Component Save Post Change are done.

-
(i) Submit: To submit the approval request.
-
(ii) Deny: To deny the approval request.
-
(iii) Pushback: To push back the request to the origin requestor for correction etc.
-
(iv) Re-submit: Click to resubmit a completed transaction to all approvers in the approval path.
This button is only available when the transaction is complete.
-
(v) Re-start: Click to restart a currently running approval process or to restart a pending
transaction to all approvers in the approval path.
This button is only available when the transaction is pending.
-
(vi) Hard-deny: Does not allow re-submits.
If the record is a header record, then the approval process ends.
If the record is a line-level record, that particular line's processing ends, while the other
records in that transaction continue.
Submit
Component string &c_sAppr_Action;
Component string &c_sSubmitBtn;
&c_sAppr_Action = "S";
If ( Not GetRow().IsChanged) Then
SetComponentChanged();
End-If;
DoSave();
&c_sSubmitBtn = "Y";
Pushback
Component string &c_sAppr_Action;
&c_sAppr_Action = "P";
If ( Not GetRow().IsChanged) Then
SetComponentChanged();
End-If;
DoSave();
Deny
Component string &c_sAppr_Action;
&c_sAppr_Action = "D";
If ( Not GetRow().IsChanged) Then
SetComponentChanged();
End-If;
DoSave();
Approve
Component string &c_sAppr_Action;
&c_sAppr_Action = "A";
If ( Not GetRow().IsChanged) Then
SetComponentChanged();
End-If;
DoSave();
Restart
Component string &c_sAppr_Action;
&c_sAppr_Action = "RS";
If ( Not GetRow().IsChanged) Then
SetComponentChanged();
End-If;
DoSave();
Re-submit
Component string &c_sAppr_Action;
&c_sAppr_Action = "R";
If ( Not GetRow().IsChanged) Then
SetComponentChanged();
End-If;
DoSave();
Hard Deny
Component string &c_sAppr_Action;
&c_sAppr_Action = "HD";
If ( Not GetRow().IsChanged) Then
SetComponentChanged();
End-If;
DoSave();
Component Post Build Code:
import EOAW_CORE:LaunchManager;
import EOAW_CORE:ApprovalManager;
Declare Function createStatusMonitor PeopleCode EOAW_MON_WRK.EOAW_FC_HANDLER
FieldFormula;
Component EOAW_CORE:LaunchManager &c_aweLaunchManager;
Component EOAW_CORE:ApprovalManager &c_aweApprManager;
Component string &c_sAppr_Action;
Constant &PROCESS_ID = "SRM_M_002";
Local Record &headerRec = GetRecord(Record.SRM_M_AWE2_HDR);
/******** PostBuild mainline D code ********/
/* Initialize the launch and approval managers. ApprovalManager will
* need reinitialization on submit
*/
&c_aweLaunchManager = create EOAW_CORE:LaunchManager(&PROCESS_ID, &headerRec,
%OperatorId);
&c_aweApprManager = create EOAW_CORE:ApprovalManager(&PROCESS_ID, &headerRec,
%OperatorId);
/* Uncomment the following line if you don’t want AWE to choose the
* Definition Id based on the preconfigured definition criteria.
* Definition criteria is maintained using the “Setup Process
* Definition” component.
*/
&c_aweLaunchManager.definition = "SRM_M_002";
If &c_aweApprManager.hasAppInst Then
&isApprover = &c_aweApprManager.hasPending;
createStatusMonitor(&c_aweApprManager.the_inst, "A", Null, False);
End-If;
Component Save Post Change Code:
/**
* AWE SavePostChange Code
* This Save Post Change Code Will Handled When Submit, Approve & Deny Action Performed
**/
/** Import Approval Framework Base Classes */
import EOAW_CORE:LaunchManager;
import EOAW_CORE:ApprovalManager;
/** Declare functions*/
Declare Function createStatusMonitor PeopleCode EOAW_MON_WRK.EOAW_FC_HANDLER
FieldFormula;
Component EOAW_CORE:LaunchManager &c_aweLaunchManager;
Component EOAW_CORE:ApprovalManager &c_aweApprManager;
Component string &sbmt_action;
Component string &c_AWEProcessDefnID;
Component Record &headerRec; /** We have set it Component Level, So Get Acess to Others
Component **/
Component string &c_sAppr_Action;
Component Rowset &line_rws;
Local Record &line;
Local number &i;
&headerRec = GetRecord(Record.SRM_M_AWE2_HDR);
&line_rws = GetLevel0()(1).GetRowset(Scroll.SRM_M_AWE2_LINE);
Local boolean &IsActionTaken = True;
Local string &sActionMsgString = "";
Evaluate &c_sAppr_Action
When "S"
/* Call DoSubmit, passing in current header info. ;*/
/** It is always safe to call this method (as long as the header record being passed in is valid!), */
&c_aweLaunchManager.DoSubmit();
If (&c_aweLaunchManager.hasAppInst) Then
/** Initialize Approval Manager if transaction was submitted */
&c_aweApprManager = create
EOAW_CORE:ApprovalManager(&c_aweLaunchManager.txn.awprcs_id, &headerRec, %OperatorId);
End-If;
Break;
When "A"
/* Call DoApprove, passing in current header info. */
For &i = 1 To &line_rws.ActiveRowCount
&line = &line_rws(&i).GetRecord(Record.SRM_M_AWE2_LINE);
&c_aweApprManager.DoApprove(&headerRec);
&c_aweApprManager.DoApprove(&line);
End-For;
Break;
When "D"
/* Call DoDeny, passing in current header info. */
For &i = 1 To &line_rws.ActiveRowCount
&line = &line_rws(&i).GetRecord(Record.SRM_M_AWE2_LINE);
&c_aweApprManager.DoDeny(&headerRec);
&c_aweApprManager.DoDeny(&line);
End-For;
Break;
When "P"
/* Call Pushback passing in current header info. */
For &i = 1 To &line_rws.ActiveRowCount
&line = &line_rws(&i).GetRecord(Record.SRM_M_AWE2_LINE);
&c_aweApprManager.DoPushback(&headerRec);
&c_aweApprManager.DoPushback(&line);
End-For;
Break;
When "HD"
/* Call HardDeny, passing in current header info. */
For &i = 1 To &line_rws.ActiveRowCount
&line = &line_rws(&i).GetRecord(Record.SRM_M_AWE2_LINE);
&c_aweApprManager.DoHardDeny(&headerRec);
&c_aweApprManager.DoHardDeny(&line);
End-For;
Break;
When "RS"
&c_aweLaunchManager.DoRestart();
If (&c_aweLaunchManager.hasAppInst) Then
/** Initialize Approval Manager if transaction was submitted */
&c_aweApprManager = create
EOAW_CORE:ApprovalManager(&c_aweLaunchManager.txn.awprcs_id, &headerRec, %OperatorId);
End-If;
Break;
When "R"
&c_aweLaunchManager.DoResubmit();
If (&c_aweLaunchManager.hasAppInst) Then
/** Initialize Approval Manager if transaction was submitted */
&c_aweApprManager = create
EOAW_CORE:ApprovalManager(&c_aweLaunchManager.txn.awprcs_id, &headerRec, %OperatorId);
End-If;
Break;
End-Evaluate;
/** Show Transaction Status Monitor & Save & Submit Button **/
If (&c_aweApprManager.hasAppInst) Then
&IsActionTaken = &c_aweApprManager.hasPending;
createStatusMonitor(&c_aweApprManager.the_inst, "A", Null, False);
REM SRM_M_AWE2_WR.EOAW_SUBMIT.Visible = False;
REM SRM_M_AWE2_WR.EOAW_APPROVE.Visible = False;
REM SRM_M_AWE2_WR.EOAW_DENY.Visible = False;
End-If;
/* Reset &Action to Null */
&sbmt_action = " ";
Creating Application Package:
Save As the delivered “EOAW_CORE” application package’s required application classes.
and add a new class to it.
SRM_M_AWE2_LINE_CLASS

Application Class Code:
import EOAW_CORE:ApprovalEventHandler;
import EOAW_CORE:ENGINE:AppInst;
import EOAW_CORE:ENGINE:AdHocStepInst;
import EOAW_CORE:ENGINE:UserStepInst;
import EOAW_CORE:ENGINE:StepInst;
import EOAW_CORE:ENGINE:Thread;
import EOAW_CORE:*;
class SRM_M_AWE2_LINE_CLASS extends EOAW_CORE:ApprovalEventHandler
method SRM_M_AWE2_LINE_CLASS();
method OnAdHocInsert(&stepinst As EOAW_CORE:ENGINE:AdHocStepInst, &approver As array
of string);
method OnProcessLaunch(&appinst As EOAW_CORE:ENGINE:AppInst);
method OnLineDeny(&userstep As EOAW_CORE:ENGINE:UserStepInst);
method OnLineApprove(&appinst As EOAW_CORE:ENGINE:AppInst, &thread As
EOAW_CORE:ENGINE:Thread);
private
instance Record &HeaderRecord; /** Declare Record Instance **/
end-class;
/** Constructor */
method SRM_M_AWE2_LINE_CLASS
%Super = create EOAW_CORE:ApprovalEventHandler();
&HeaderRecord = CreateRecord(Record.SRM_M_AWE2_HDR); /** Set the Header Record **/
end-method;
method OnProcessLaunch
/+ &appinst as EOAW_CORE:ENGINE:AppInst +/
/+ Extends/implements EOAW_CORE:ApprovalEventHandler.OnProcessLaunch +/; /** Set
Approval Prcoess **/
Local string &item, &asset;
Local Rowset &line_rws;
Local Record &line;
Local number &i;
/** Update the Workflow Status **/
&line_rws = GetLevel0()(1).GetRowset(Scroll.SRM_M_AWE2_LINE);
For &i = 1 To &line_rws.ActiveRowCount
&line = &line_rws(&i).GetRecord(Record.SRM_M_AWE2_LINE);
&asset = &line.GetField(Field.ASSET_ID).Value;
&item = &line.GetField(Field.ITEMNAME).Value;
End-For;
Local Record &recHdrRecord = CreateRecord(Record.SRM_M_AWE2_LINE);
&recHdrRecord.GetField(Field.ASSET_ID).Value = &asset;
rem &recHdrRecord.GetField(Field.ITEMNAME).Value = &item;
If &recHdrRecord.SelectByKey() = True Then
For &i = 1 To &line_rws.ActiveRowCount
&line = &line_rws(&i).GetRecord(Record.SRM_M_AWE2_LINE);
&line.GetField(Field.WF_STATUS).Value = "S"; /** Set InApproval Process **/
&line.Update();
End-For;
GetLevel0().Refresh();
End-If;
end-method;
method OnLineApprove
/+ &appinst as EOAW_CORE:ENGINE:AppInst, +/
/+ &thread as EOAW_CORE:ENGINE:Thread +/
/+ Extends/implements EOAW_CORE:ApprovalEventHandler.OnLineApprove +/
Local string &as, &kov;
Local Record &poRecord;
Local EOAW_CORE:ApprovalManager &appMgr;
Local number &lineNbr;
/*—Line Approval—*/
&poRecord = CreateRecord(Record.SRM_M_AWE2_LINE);
&thread.SetAppKeys(&poRecord);
&as = &poRecord.ASSET_ID.Value;
&kov = &poRecord.GetField(Field.ITEMNAME).Value;
SQLExec("UPDATE PS_SRM_M_AWE2_LINE SET WF_STATUS = :1 WHERE ASSET_ID = :2 AND
ITEMNAME = :3", "A", &as, &kov);
GetLevel0().Refresh();
end-method;
method OnLineDeny
/+ &userstep as EOAW_CORE:ENGINE:UserStepInst +/
/+ Extends/implements EOAW_CORE:ApprovalEventHandler.OnLineDeny +/
Local string &as, &kov;
Local Record &poRecord;
Local EOAW_CORE:ApprovalManager &appMgr;
Local number &lineNbr;
/*—Line Approval—*/
&poRecord = CreateRecord(Record.SRM_M_AWE2_LINE);
&userstep.step.path.thread.SetAppKeys(&poRecord);
&as = &poRecord.ASSET_ID.Value;
&kov = &poRecord.GetField(Field.ITEMNAME).Value;
SQLExec("UPDATE PS_SRM_M_AWE2_LINE SET WF_STATUS = :1 WHERE ASSET_ID = :2 AND
ITEMNAME = :3", "D", &as, &kov);
GetLevel0().Refresh();
end-method;
method OnAdHocInsert
/+ &stepinst as EOAW_CORE:ENGINE:AdHocStepInst, +/
/+ &approver as Array of String +/
/+ Extends/implements EOAW_CORE:ApprovalEventHandler.OnAdHocInsert +/
&stepinst.Save();
end-method;
Transaction Demo:

Adhoc Approvers
Adhoc approvers/reviewers are users that an approver or requester would like to review a
transaction. Hence, we can add Adhoc user in the process for additional approver or review,
which is shown below. Adhoc reviewers are notified and provided with a link in a worklist
entry or email to the transaction, if the process is so configured.
In configuration transaction we have to add Adhoc user list.

APPROVAL WORKFLOW ENGINE
Many daily tasks are part of a larger process that involves several steps and people working
together. The term workflow refers to this process, which could surround, for example, the approval of a purchase orders or a job change request form. To facilitate this type of multiuser process, the PeopleSoft product can automatically trigger workflow notifications to inform the next approver in the process of work awaiting them.
The Approval Workflow Engine (AWE) is the engine that provides the framework and capabilities for creating, running, and managing approval processes. The engine uses a series of database objects combined with application component configuration settings to determine how to process approvals using workflow.
For example, the process of submitting a promotion and getting it approved requires defining who will approve the promotion, the order in which they will approve it, and how it will be routed to approvers.
Using Approval Framework, you can:
Header vs Line Level AWE
The difference between Header and Line-Level AWE is only related to the Line-level versus header-level end actions.
Using line-level approvals makes it possible for an action to be taken on different line items upon their approval, without waiting for the approval of other line items in the requisition. You can source line items as soon as they are approved.
The Header actions allow the transaction lines to be grouped together and processed as one unit.
Header Record
In the following example, SRM_AWE_H_TBL is created, that would be your header record.

EMPLID is the only Key in the record shown above. Similarly, you need to create one header record.
Cross Reference Record

Unlike the header record, which plays a part in your transaction processing, the cross-reference record is used solely by the AWE. Your application does not need to retrieve any information off this record and should never update this record. The AWE uses this record as its only link between itself and the transaction.
A work record SRM_AWE_H_WRK is created to store button fields. i.e. for Submit, Approve, Deny, Pushback, etc.
Here the fields, PUSH1_WCB, PUSH2_WCB, PUSH3_WCB, PUSH4_WCB are taken for Submit Button, Approve, Deny, Pushback buttons respectively.

EOAW_IDS
The EOAW_IDS is a delivered record by Peoplesoft that is the base record that is used to create some of AWE’s key values. For example, your cross-reference record contains a numeric field called EOAWTHREAD_ID. Whenever this value is set for a newly instantiated transaction, the engine refers to the EOAWAW_IDS.EOAWCOUNTER field. The engine retrieves the value, and then increments it accordingly for the next transaction.
Also below are some Main Setup and Transaction tables for Workflow
|
S.NO |
TABLE NAME |
TABLE DESCRIPTION |
|
1 |
PS_EOAW_PRCS |
This table holds the Approval Process definition properties. Gets populated when we manually configure Approval Process Setup |
|
2 |
PS_EOAW_STEP |
Approval Step. Gets populated when we manually configure Approval Process Setup |
|
3 |
PS_EOAW_PATH |
Approval Path Definition. Gets populated when we manually configure Approval Process Setup |
|
4 |
PS_EOAW_STAGE |
Approval Stage |
|
5 |
PS_EOAW_STEPINST |
Instance of approval step |
|
6 |
PS_EOAW_USERINST |
Step instance assigner to user |
|
7 |
PS_EOAW_WL |
Worklist used for all Approvals |
Event Handler
The AWE is designed around a series of specific, pre-defined events. The workflow engine then uses PeopleSoft Application’s classes in order to allow applications to extend its own processing. Here is an example of what the delivered Peoplesoft Approval Workflow’s event handler application package (EOAW_CORE) and its class definition looks like:

You will be required to create your own version of this class, as shown below and use the same. When you extend the superclass, make sure that your SUB class only contains the methods that you want to extend as per the customizations you’re required to build in your workflow.
Once the delivered classes like ApprovalEventHandler, ApprovalManager, LaunchManager are extended, the application’s sub-class should only include the methods (or properties) that it wishes to overwrite.
Thread Class
The Thread Class is a delivered application class that relates to what is displayed on the Status Monitor. The Status Monitor, as shown below, illustrates the approval process flow and up to date status of the process.

When constructing the status monitor, the AWE uses the Thread keys as the default group box header.
The delivered threadDescr class allows you to override this default and display something more meaningful to the user. Also, for each step within an approval process, the administrator monitor generates a link for viewing additional information related to that user. The default link text is constructed using the description of the user’s operator id. If an adopting application wishes to override that functionality, the
can do so by extending the getUserName method in the threadDescr base class. Here is an example of what the delivered threadDescr class looks like:
Delivered Package Definition:

Delivered Class Definition:
end-class;
Email Approvals
If you wish to allow users to approve transactions straight from the email notification that they receive, you need to use the Email Collaboration Framework, which is an another delivered functionality.
Steps to configure a Header Level Approval Workflow Engine.
After setting up the header record along with the cross reference and derived work as shown above,

Further, a custom Application Package SRM_AWE_H_PKG is created, with custom application class approvaleventhandler inside it.
You need to create an application package with an application class inside it in the same way and add the following code “on execute” event of the same class, replacing the header record name which is shown in the demo with the name of the header record created by you previously, along with its key fields and non- key fields.

/******************* CODE: ***********/
import EOAW_CORE:ApprovalEventHandler; import EOAW_CORE:ENGINE:AppInst; import EOAW_CORE:ENGINE:UserStepInst; import EOAW_CORE:ENGINE:StepInst; import EOAW_CORE:ENGINE:Thread;
class approvaleventhandler extends EOAW_CORE:ApprovalEventHandler method approvaleventhandler();
method OnProcessLaunch(&appinst As EOAW_CORE:ENGINE:AppInst);
method OnStepComplete(&stepinst As EOAW_CORE:ENGINE:StepInst); method OnHeaderApprove(&appinst As EOAW_CORE:ENGINE:AppInst); method OnHeaderDeny(&userinst As EOAW_CORE:ENGINE:UserStepInst);
end-class;
end-method;
Approval Prcoess **/
Local string &HdrRecTopKeyValue; &appinst.thread.SetAppKeys(&HeaderRecord); &HeaderRecord.SelectByKey();
End-If; end-method;
Local string &HdrRecTopKeyValue;
&stepinst.path.thread.SetAppKeys(&HeaderRecord); &HeaderRecord.SelectByKey();
&recHdrRecord.GetField(Field.APPROVAL_STATUS).Value = "U"; &recHdrRecord.Update();
GetLevel0().Refresh(); End-If;
end-method;
Local string &HdrRecTopKeyValue;
&appinst.thread.SetAppKeys(&HeaderRecord); &HeaderRecord.SelectByKey();
End-If; end-method;
Local string &HdrRecTopKeyValue;
&userinst.thread.SetAppKeys(&HeaderRecord); &HeaderRecord.SelectByKey();
End-If; end-method;
Permission Lists Definitions (Maintain Permission Lists)
Permission Lists are directly related to Peoplesoft Security. We assign a set of permission lists to our pages, components and menus to make them appear for some of the desirable users only.
|
Record |
Description |
|
PSCLASSDEFN |
Permission lists are where the security really happens. They provide access to menus, components and pages and a host of other security including People Tools, Process security, Component Interfaces, Web Libraries, Web Services, Personalisations, Query and Mass Change. |
|
PSAUTHITEM |
The link between permission lists and menus. |
Creating a permission list for our page. Users with the role belonging to the same permission list will be able to view the page.

Registering our page and giving a proper security to our page by assigning it with a custom permission list.

Permission Lists and assigning them to a particular user.
This PeopleSoft application delivers a set of default user-list roles corresponding to the levels within an organization, such as EMPLOYEE, MANAGER, and VICE PRESIDENT.
|
Record |
Description |
|
PSROLEDEFN |
Stores roles and their properties. Roles can be assigned dynamically through Query, PeopleCode or LDAP. Roles are also used in conjunction with Workflow and routing. |
|
PSROLECLASS |
Roles are made of up of one or permission lists, and this table links the two together. Very handy. |
Adding Permission List to a Role:
-
Search and open the desired role in the Roles component and go to the Permission Lists tab.
-
In the Permission Lists grid, add the name of the permission list that should be assigned to
the role.
-
Save the component.
Roles and Permissions lists share a many to many relationships. A single role can have multiple permission lists and a permission list can be assigned to several different roles.
Creating appropriate Roles for different levels of steps in the Approval Process and mapping them with the permission lists, created as shown above.

User Lists Definitions (Maintain User Lists)
There are four types of User Lists you can define to help the system resolve who the next approver is for a given transaction.
-
Role – The system will return all the users in the specified role to the engine at runtime. For example, you want all Address Change requests to go to the role of HR Administrator for approval in which case anyone in that role will receive notification of the transaction.
-
SQL Definition – You need to enter SQL Object name they have created through Application Designer. The SQL Object must select OPRID in its select statement.
-
Query – You need to enter Query Name they have created through Application Designer. As with the SQL Definition, the Query must select OPRID in its select statement. If you are creating the query in the Query Manager component, you must set the Query Type value of the query to Process. Setting the Query Type value to User can cause an error.
-
Application Class – You need to provide Application Package Name and Application Class name. The application class must Extend the EOAW_CORE:Defn:UserListBase Class.
Creating a set of User Lists and associating some of the users as members to them.

Registering Transactions in AWE
Once you have created and defined all the required objects as described, you must now register your transaction in the AWE’s approval transaction registry. You must create a unique approval process ID for each transaction.
Navigation: Main Menu - Enterprise Components – Approvals – Approvals – Transaction Registry.
The following is the detailed information of this Register Transactions page.


Process ID (Approval Process ID) – This is a unique approval process identifier for the transaction. This unique identifier needs be passed in when AWE is invoked by the transaction.
Description – The description of this unique approval process identifier for the transaction. Object Owner ID – The owner ID of this specific transaction.
Cross Reference Table – This table is required and it consists of two parts: a sub record EOAW_XREF_SBR and key fields of an application transaction.
Enable Notifications – This notification option is applied at the transaction level. It determines whether the transaction allows notifications or not. There are four different notification options: Email, Worklist, Both or None. The latter section of the document carries how to use email templates and send notifications.
Use Email Approvals – If this box is checked, then an HTML email with an enclosed form will be generated and sent to a recipient. The recipient can take an action on the transaction within the email itself without having to log into the system.
Default Approval Component
Menu Name/ Approval Component – This is the default approval location for your transaction. It identifies the default component that users should go to when selecting a worklist entry or in other words where the user must go to in order to approve the transaction.
handler class as described in the Event Handler.
approvals. The first row will always be the header level.
Record Name- Select your header record name in the row that you marked as “Header” level and your line level record name in the row you marked as “Line”.
Level Record Key Field Label IDs – When you define the record names for each level in your transaction, the Level Record Key Field Label IDs section is automatically populated with the key fields from each of the records you defined. You select from the list of available field label IDs for the AWE to use for them.
Transaction Configurations in AWE
The transaction is registered, you need to set the configuration options for the transaction now. The following is the detailed information for the Configure Transactions page.
Navigation: Main Menu - Enterprise Components – Approvals – Approvals – Transaction Configuration.


Events
The events section of the Configure Transactions page is used for setting up notifications for your transaction.
Header or Line – Select the level at which an event occurrence will trigger the notification. Event – Select the event for triggering the notification.
On Final Approval - When the final step in an approval process is approved. On Final Denial - When the final step in an approval process is denied.
On Process Launch - When an approval process is launched (i.e. a transaction is first submitted).
Push Back - When a step is pushed back to the previous step in the approval chain.
Route for Approval - Anytime the transaction is routed to an approval step.
Menu Name – The default menu that is used when creating the link that will be embedded in your email notification.
Approval Component – The default component that is used when creating the link that will be embedded in your email notification.
Page Name - The default page that is used when creating the link that will be embedded in your email notification.
SQL Object Identifier – The default SQL Object that will be used to populate the binds in your email notification template.
Participant – Select the Participant for whom you want the notification to be sent. Approvers Any approvers associated with the particular step for which the event has been triggered.
Template Name – If Email or Both is selected as the Channel, then select the email template name that should be used in the email notification.
Setup Process Definitions
Under Setup Process Definitions, you will define one or more process definitions for each of your transactions. You will be defining the number of stages, paths, and steps required for your process definition created above.
In addition, you can define criteria that the AWE will use to determine which process definition, path, or step to use at run time.
Navigation: Main Menu - Enterprise Components – Approvals – Approvals – Approval Process Setup.
Approval Process Viewer – The approval process viewer displays an Adobe SVG Viewer interpretation of the selected approval process definition. This tool is used simply to create a more user-friendly display of the current approval process.
Process ID – The approval process ID as defined in the Register Transactions page. Definition ID – The name of the approval process that was determined upon entry to this

Admin Role – This is the approvals administrator for this approval definition.
Status – This is the effect.
User Auto Approval – An approver may appear more than once in the same approval process. If “User Auto Approval” checkbox is turned on, then this approver’s action will be remembered and automatically reapplied whenever this approver appears again in the approval chain of the transaction.
If the Route to Requester flag is set to “off”, he/she will be skipped from performing action on those steps.
If self-approval is set up, the criteria to trigger self-approval is not met, and route to requester is not selected, then the requester can't be included as part of the approval path.
Stages / Paths / Steps
Stages – A stage is a high-level grouping of approval paths. Paths within the same stage are carried out in parallel. In order to achieve sequential path processing, paths need to belong to separate stages.
Paths – Approval Paths are logical groupings of approval steps. Again, paths belonging to the same stage are carried out in parallel.
Escalate Options – There are three escalation actions that you can choose from: Advance Approval, Notify Participant, or Reassign Approval.
Escalation Option Description in Approval Path Definition
Reassign Approval - Will reassign the step to the participant generated by the corresponding user list.
Criteria Definitions
For example, you may want employees based out of Europe earning more than Rupees 100,000 per year to have only one level of approval for submitted promotion requests whereas for all employees in the INDIA you want three levels of approval for any submitted promotion request. Any criteria evaluation is possible as long as the appropriate fields exist in your header record.
Criteria Type 1 – Always True – Always true simply means that whenever the system evaluates this criterion it will always return a ‘True’ to the engine.
Criteria Type II – Application Class – Allows you to define an application class to be executed at the time the criteria are evaluated.
Criteria Type III – User Defined – The User Defined criteria type allows you to set up rules based on the fields that exist on the header record of your transaction and delivered operands.
Monetary Criteria – Use the monetary criteria section to define criteria logic for monetary fields only. The system displays this section when you select the Criteria Type value of User Entered. Use this section to establish approval criteria based on a value or amount.
Alert Criteria – With the criteria object defined, you can then evaluate the criteria to determine if a message should be displayed on the approval page.
After completing the process on the interface’s end, coming back to our page’s project in the application designer. And adding some necessary codes to it.
Component Post Build Code. Note: You will be needed to replace
-
the demo’s Process ID with your process ID created,
-
the Definition ID with your Process Definition Created in the Approval Process Setup Section,
-
the header record with your header record.
event. ***/
/** Get Assigned Approval Process Id for selected transaction From Workflow Transaction Page **/ &c_AWEProcessDefnID = "SRM_AWE_H"; /** PROCESS ID **/
&c_aweApprovalManager = create EOAW_CORE:ApprovalManager(&c_AWEProcessDefnID, &headerRec, %UserId);
/** Set Up Approval Process Defination **/ &c_aweLaunchManager.definition = "test1"; /** DEFINITION ID **/
/** Show Transaction Status Monitor & Save & Submit Button **/ If &c_aweApprovalManager.hasAppInst Then
createStatusMonitor(&c_aweApprovalManager.the_inst, "A", Null, False);
SRM_AWE_H_WRK.PUSH1_WCB.Visible = False; End-If;
/*** Show Approve & Deny Button Based on Condition ***/ If &c_aweApprovalManager.hasPending And
&c_aweApprovalManager.GetParticipant(%UserId) = "AA" Then
SRM_AWE_H_TBL.APPROVAL_STATUS = "U"; SRM_AWE_H_WRK.PUSH2_WCB.Visible = True; SRM_AWE_H_WRK.PUSH1_WCB.DisplayOnly = False; SRM_AWE_H_WRK.PUSH3_WCB.DisplayOnly = False; SRM_AWE_H_WRK.PUSH2_WCB.DisplayOnly = False; SRM_AWE_H_WRK.PUSH3_WCB.Visible = True; SRM_AWE_H_WRK.PUSH1_WCB.Visible = False;
Component Save Post Change Code.
Component EOAW_CORE:LaunchManager &c_aweLaunchManager; Component EOAW_CORE:ApprovalManager &c_aweApprovalManager;
/* When Data Saved As Draft */
Break; When "S"
&c_aweLaunchManager.DoSubmit(); End-If;
End-If;
&Ex1.DefaultText; &IsActionTaken = False;
/** Initialize Approval Manager if transaction was submitted */
&c_aweApprovalManager = create EOAW_CORE:ApprovalManager(&c_aweLaunchManager.txn.awprcs_id, &headerRec, %UserId);
&c_aweApprovalManager.AddComments(%UserId, &headerRec, &comment); /*For Requester’s Side.*/
UnHide(SRM_AWE_H_TBL.APPROVAL_STATUS);
SRM_AWE_H_TBL.APPROVAL_STATUS.Value = "P"; End-If;
Break;
/*For Approver’s Side.*/
&c_aweApprovalManager.DoApprove(&headerRec); catch Exception &Ex2
&sActionMsgString = "Unable to DoApprove on the ApprovalManager." | Char(10) | " Error - " | &Ex2.DefaultText;
&c_aweApprovalManager.DoDeny(&headerRec);
&c_aweApprovalManager.AddComments(%UserId, &headerRec, &comment);
&Ex3.DefaultText; &IsActionTaken = False;
end-try;
Break; When "P"
/* Call DoPushback, passing in current header info. */ try
&c_aweApprovalManager.DoPushback(&headerRec);
&c_aweApprovalManager.AddComments(%UserId, &headerRec, &comment);
&Ex4.DefaultText; &IsActionTaken = False;
end-try;
Break; When-Other
&sActionMsgString = "Error - Invalid Action.";
&IsActionTaken = False; End-Evaluate;
/** Show Specified Action Message Box **/ If &sActionMsgString <> " " And
End-If;
/** Show Transaction Status Monitor & Save & Submit Button **/ If &c_aweApprovalManager.hasAppInst Then
createStatusMonitor(&c_aweApprovalManager.the_inst, "D", Null, False);
SRM_AWE_H_WRK.PUSH1_WCB.Visible = False; SRM_AWE_H_WRK.PUSH2_WCB.Visible = False; SRM_AWE_H_WRK.PUSH3_WCB.Visible = False; SRM_AWE_H_WRK.PUSH4_WCB.Visible = False;
/* Toggle all fields with the exception of the status monitor as display only. We cannot change the page property as the status monitor fields would be disabled */
Local Rowset &Rs = GetLevel0(); For &i = 1 To &Rs(1).RecordCount
&Rec = &Rs(1).GetRecord(&i); For &j = 1 To &Rec.fieldcount
&Rs(1).GetRecord(&i).GetField(&j).DisplayOnly = True; End-For;
End-For; End-If;
/* Reset &Action to Null */ &c_sAppr_Action = " ";
Note: The AddComments method from the delivered ApprovalManager class is called to add important remarks/comments in the comment box section that we had already added on our page.
Submit Button Code.
/** Submit Button **/
Component string &c_sAppr_Action; Component string &c_sSubmitBtn;
&c_sAppr_Action = "S";
If ( Not GetRow().IsChanged) Then /** force save processing **/ SetComponentChanged();
End-If;
DoSave(); &c_sSubmitBtn = "Y";
Page.SRM_AWE_H_PG.DisplayOnly = True;
Approve Button Code.
/** Approve Button **/
Component string &c_sAppr_Action;
/** force save processing **/
SetComponentChanged(); End-If;
DoSave(); Page.SRM_AWE_H_PG.DisplayOnly = True;
Deny Button Code.
/** Deny Button */
Component string &c_sAppr_Action;
/** force save processing **/
SetComponentChanged(); End-If;
DoSave(); Page.SRM_AWE_H_PG.DisplayOnly = True;
Pushback Button Code.
/** Pushback Button */
Component string &c_sAppr_Action;
/** force save processing **/
SetComponentChanged(); End-If;
DoSave(); Page.SRM_AWE_H_PG.DisplayOnly = True;
Now coming to the page, we designed on the PIA interface, once again to test the functionality. The user will be requesting for an amount value to be approved.


The request then comes to the approver in the list to which the approver can take his/her desirable actions. Request approved, push backed or denied is shows as below.


In line level approval, multiple approvers can be included for individual steps Each item can be routed to different approvers, based on certain criteria.
Denial /Approval of one-line item does not affect the other.
Most of the steps in line level are same as Header level approval. Let us see a sample workflow process using line level approval.
SAMPLE TEST CASE:
An employee tries to submit different items (Laptop and Desktop) based on the asset id. Each item is routed to different approvers and the approver can approve only the specific items routed to him/her.
A component has to be created for the employee to submit the asset items and for the managers to approve/deny them. Let’s see the process step by step.
Steps to configure a Line Level Approval Workflow Engine.
Step 1: Create a top-level header record ASSET_ID as key-field. Also, create a line record with ASSET_ID and ITEM_NAME as keys. For header level approval, only the header record is enough.
Header Record: SRM_M_AWE2_HDR
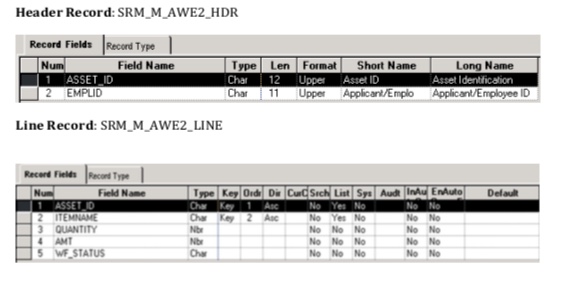
Step 2: Create a cross reference record with the key-fields used in header and line record as non-keys here to link the workflow process to PIA. Include the EOAW_XREF_SBR delivered sub-record in this record for getting the thread values.
Reference Record: SRM_M_AWE2_XREF

Step 3: Design a standard page with the header record at level 0 and line record at level 1 as shown below. Include the delivered sub-page EOAW_MON_SBP to this page for displaying the Approval status monitor.

Step 4: Create a new component with the header record as search record. Place the page in this component and register the component to a menu.
Step 5: Give the appropriate permission lists and security access to the component. Step 6: Coming to the PIA configuration, navigate to
Main Menu -> Enterprise Components -> Approvals -> Approvals -> Transaction Registry.
Add a new Process ID and specify the cross reference, header and line level record names as shown below. Create a new application package and a class and include it here. The coding for app package is mentioned later.

Step 7: Create generic templates for submission, approval and denial etc. by navigating to
Main Menu -> Peopletools -> Workflow -> Notifications -> Generic Templates.
The emails triggered to the requester and approver will be in the format of this template created. Create a SQL to fetch the bind values mentioned in the template. Like the approval template shown below, similarly create a template for submission and denial mails etc.
This step is needed only if business requires notifications to be sent, else creation of generic templates is optional.

Main Menu -> Enterprise Components -> Approvals -> Approvals -> -> Transaction Configuration
Here, add the following four events mandatories:


If generic templates had been created earlier step, then mention those names here to each event respectively, but this is not mandatory.

Step 9: Navigate to
Main Menu -> Enterprise Components -> Approvals -> Approvals -> Approval Process Setup. Add a new Definition ID for the Process id created.

A. The checkbox Take Action on Line Completion gets automatically checked for line level approval.
B. Approver User list can be created by mapping it to a specified role or Application Package, SQL or Query. The approval of submitted transactions are based on certain criteria.
C. Stage is a collection of paths and can be at header level or line level. As level here, specify line level is being used here, create 3 paths.
D. A path is a collection of steps and since we have 2 items here. Once a transaction is being
submitted, it will route to two different approvers as shown above.
Laptop Or
Desktop
E. Click on the Definition Criteria and Alert Criteria links and give it as always true. In all the two path level criteria, mention the criteria as “User Entered” and enter the record field value which must be considered for approving.

In the above screenshot, the value is entered as “L” which stands for Laptop. So, the User list mapped to this value can approve only Laptop transactions. Similarly, for Desktop, criteria is added and value is given as “D”.
Step 10: In the backend, the coding in work record buttons Field Change and the Component Post Build, Component Save Post Change are done.

-
(i) Submit: To submit the approval request.
-
(ii) Deny: To deny the approval request.
-
(iii) Pushback: To push back the request to the origin requestor for correction etc.
-
(iv) Re-submit: Click to resubmit a completed transaction to all approvers in the approval path.
This button is only available when the transaction is complete.
-
(v) Re-start: Click to restart a currently running approval process or to restart a pending
transaction to all approvers in the approval path.
This button is only available when the transaction is pending. -
(vi) Hard-deny: Does not allow re-submits.
If the record is a header record, then the approval process ends.
If the record is a line-level record, that particular line's processing ends, while the other records in that transaction continue.Submit
Component string &c_sAppr_Action; Component string &c_sSubmitBtn;
&c_sAppr_Action = "S";
If ( Not GetRow().IsChanged) Then SetComponentChanged();
End-If;
DoSave(); &c_sSubmitBtn = "Y";
Pushback
Component string &c_sAppr_Action;
&c_sAppr_Action = "P";
If ( Not GetRow().IsChanged) ThenSetComponentChanged(); End-If;
DoSave();
Deny
Component string &c_sAppr_Action;
&c_sAppr_Action = "D";
If ( Not GetRow().IsChanged) ThenSetComponentChanged(); End-If;
DoSave();
Approve
Component string &c_sAppr_Action;
&c_sAppr_Action = "A";
If ( Not GetRow().IsChanged) ThenSetComponentChanged(); End-If;
DoSave();
Restart
Component string &c_sAppr_Action;
&c_sAppr_Action = "RS";
If ( Not GetRow().IsChanged) ThenSetComponentChanged(); End-If;
DoSave();
Re-submit
Component string &c_sAppr_Action;
&c_sAppr_Action = "R";
If ( Not GetRow().IsChanged) ThenSetComponentChanged(); End-If;
DoSave();
Hard Deny
Component string &c_sAppr_Action; &c_sAppr_Action = "HD";
If ( Not GetRow().IsChanged) ThenSetComponentChanged(); End-If;
DoSave();
Component Post Build Code:
import EOAW_CORE:LaunchManager; import EOAW_CORE:ApprovalManager;
Declare Function createStatusMonitor PeopleCode EOAW_MON_WRK.EOAW_FC_HANDLER FieldFormula;
Component EOAW_CORE:LaunchManager &c_aweLaunchManager;
Component EOAW_CORE:ApprovalManager &c_aweApprManager;Component string &c_sAppr_Action;
Constant &PROCESS_ID = "SRM_M_002";
Local Record &headerRec = GetRecord(Record.SRM_M_AWE2_HDR); /******** PostBuild mainline D code ********/
/* Initialize the launch and approval managers. ApprovalManager will * need reinitialization on submit
*/&c_aweLaunchManager = create EOAW_CORE:LaunchManager(&PROCESS_ID, &headerRec, %OperatorId);
&c_aweApprManager = create EOAW_CORE:ApprovalManager(&PROCESS_ID, &headerRec, %OperatorId);/* Uncomment the following line if you don’t want AWE to choose the * Definition Id based on the preconfigured definition criteria.
* Definition criteria is maintained using the “Setup Process
* Definition” component.*/
&c_aweLaunchManager.definition = "SRM_M_002"; If &c_aweApprManager.hasAppInst Then&isApprover = &c_aweApprManager.hasPending;
createStatusMonitor(&c_aweApprManager.the_inst, "A", Null, False); End-If;
Component Save Post Change Code:
/**
* AWE SavePostChange Code
* This Save Post Change Code Will Handled When Submit, Approve & Deny Action Performed **//** Import Approval Framework Base Classes */ import EOAW_CORE:LaunchManager;
import EOAW_CORE:ApprovalManager;/** Declare functions*/
Declare Function createStatusMonitor PeopleCode EOAW_MON_WRK.EOAW_FC_HANDLER FieldFormula;Component EOAW_CORE:LaunchManager &c_aweLaunchManager; Component EOAW_CORE:ApprovalManager &c_aweApprManager;
Component string &sbmt_action; Component string &c_AWEProcessDefnID;
Component Record &headerRec; /** We have set it Component Level, So Get Acess to Others Component **/
Component string &c_sAppr_Action;
Component Rowset &line_rws;Local Record &line; Local number &i;
&headerRec = GetRecord(Record.SRM_M_AWE2_HDR);
&line_rws = GetLevel0()(1).GetRowset(Scroll.SRM_M_AWE2_LINE);Local boolean &IsActionTaken = True; Local string &sActionMsgString = "";
Evaluate &c_sAppr_Action When "S"
/* Call DoSubmit, passing in current header info. ;*/
/** It is always safe to call this method (as long as the header record being passed in is valid!), */ &c_aweLaunchManager.DoSubmit();
If (&c_aweLaunchManager.hasAppInst) Then/** Initialize Approval Manager if transaction was submitted */
&c_aweApprManager = create EOAW_CORE:ApprovalManager(&c_aweLaunchManager.txn.awprcs_id, &headerRec, %OperatorId);
End-If;
Break; When "A"
/* Call DoApprove, passing in current header info. */ For &i = 1 To &line_rws.ActiveRowCount
&line = &line_rws(&i).GetRecord(Record.SRM_M_AWE2_LINE); &c_aweApprManager.DoApprove(&headerRec); &c_aweApprManager.DoApprove(&line);
End-For;
Break; When "D"
/* Call DoDeny, passing in current header info. */ For &i = 1 To &line_rws.ActiveRowCount
&line = &line_rws(&i).GetRecord(Record.SRM_M_AWE2_LINE); &c_aweApprManager.DoDeny(&headerRec); &c_aweApprManager.DoDeny(&line);
End-For; Break;
When "P"
/* Call Pushback passing in current header info. */ For &i = 1 To &line_rws.ActiveRowCount&line = &line_rws(&i).GetRecord(Record.SRM_M_AWE2_LINE); &c_aweApprManager.DoPushback(&headerRec); &c_aweApprManager.DoPushback(&line);
End-For; Break;
When "HD"
/* Call HardDeny, passing in current header info. */ For &i = 1 To &line_rws.ActiveRowCount&line = &line_rws(&i).GetRecord(Record.SRM_M_AWE2_LINE); &c_aweApprManager.DoHardDeny(&headerRec); &c_aweApprManager.DoHardDeny(&line);
End-For;
Break;
When "RS" &c_aweLaunchManager.DoRestart();
If (&c_aweLaunchManager.hasAppInst) Then/** Initialize Approval Manager if transaction was submitted */
&c_aweApprManager = create EOAW_CORE:ApprovalManager(&c_aweLaunchManager.txn.awprcs_id, &headerRec, %OperatorId);
End-If; Break;
When "R" &c_aweLaunchManager.DoResubmit();
If (&c_aweLaunchManager.hasAppInst) Then/** Initialize Approval Manager if transaction was submitted */
&c_aweApprManager = create EOAW_CORE:ApprovalManager(&c_aweLaunchManager.txn.awprcs_id, &headerRec, %OperatorId);
End-If; Break;
End-Evaluate;
/** Show Transaction Status Monitor & Save & Submit Button **/ If (&c_aweApprManager.hasAppInst) Then
&IsActionTaken = &c_aweApprManager.hasPending; createStatusMonitor(&c_aweApprManager.the_inst, "A", Null, False); REM SRM_M_AWE2_WR.EOAW_SUBMIT.Visible = False;
REM SRM_M_AWE2_WR.EOAW_APPROVE.Visible = False;
REM SRM_M_AWE2_WR.EOAW_DENY.Visible = False;End-If;
/* Reset &Action to Null */ &sbmt_action = " ";
Creating Application Package:
Save As the delivered “EOAW_CORE” application package’s required application classes.and add a new class to it.
SRM_M_AWE2_LINE_CLASS

Application Class Code:
import EOAW_CORE:ApprovalEventHandler; import EOAW_CORE:ENGINE:AppInst; import EOAW_CORE:ENGINE:AdHocStepInst; import EOAW_CORE:ENGINE:UserStepInst; import EOAW_CORE:ENGINE:StepInst; import EOAW_CORE:ENGINE:Thread;
import EOAW_CORE:*;
class SRM_M_AWE2_LINE_CLASS extends EOAW_CORE:ApprovalEventHandler
method SRM_M_AWE2_LINE_CLASS();
method OnAdHocInsert(&stepinst As EOAW_CORE:ENGINE:AdHocStepInst, &approver As array
of string);
method OnProcessLaunch(&appinst As EOAW_CORE:ENGINE:AppInst);
method OnLineDeny(&userstep As EOAW_CORE:ENGINE:UserStepInst);
method OnLineApprove(&appinst As EOAW_CORE:ENGINE:AppInst, &thread As
EOAW_CORE:ENGINE:Thread);
private
instance Record &HeaderRecord; /** Declare Record Instance **/
end-class;
/** Constructor */
method SRM_M_AWE2_LINE_CLASS
%Super = create EOAW_CORE:ApprovalEventHandler();
&HeaderRecord = CreateRecord(Record.SRM_M_AWE2_HDR); /** Set the Header Record **/
end-method;
method OnProcessLaunch
/+ &appinst as EOAW_CORE:ENGINE:AppInst +/
/+ Extends/implements EOAW_CORE:ApprovalEventHandler.OnProcessLaunch +/; /** Set Approval Prcoess **/
Local string &item, &asset;
Local Rowset &line_rws;
Local Record &line;
Local number &i;
/** Update the Workflow Status **/
&line_rws = GetLevel0()(1).GetRowset(Scroll.SRM_M_AWE2_LINE);
For &i = 1 To &line_rws.ActiveRowCount
&line = &line_rws(&i).GetRecord(Record.SRM_M_AWE2_LINE);
&asset = &line.GetField(Field.ASSET_ID).Value;
&item = &line.GetField(Field.ITEMNAME).Value;
End-For;
Local Record &recHdrRecord = CreateRecord(Record.SRM_M_AWE2_LINE);
&recHdrRecord.GetField(Field.ASSET_ID).Value = &asset;
rem &recHdrRecord.GetField(Field.ITEMNAME).Value = &item;
If &recHdrRecord.SelectByKey() = True Then For &i = 1 To &line_rws.ActiveRowCount
&line = &line_rws(&i).GetRecord(Record.SRM_M_AWE2_LINE); &line.GetField(Field.WF_STATUS).Value = "S"; /** Set InApproval Process **/ &line.Update();
End-For;
GetLevel0().Refresh(); End-If;
end-method;
method OnLineApprove
/+ &appinst as EOAW_CORE:ENGINE:AppInst, +/
/+ &thread as EOAW_CORE:ENGINE:Thread +/
/+ Extends/implements EOAW_CORE:ApprovalEventHandler.OnLineApprove +/
Local string &as, &kov;
Local Record &poRecord;
Local EOAW_CORE:ApprovalManager &appMgr;
Local number &lineNbr;
/*—Line Approval—*/
&poRecord = CreateRecord(Record.SRM_M_AWE2_LINE);
&thread.SetAppKeys(&poRecord);
&as = &poRecord.ASSET_ID.Value;
&kov = &poRecord.GetField(Field.ITEMNAME).Value;
SQLExec("UPDATE PS_SRM_M_AWE2_LINE SET WF_STATUS = :1 WHERE ASSET_ID = :2 AND ITEMNAME = :3", "A", &as, &kov);
GetLevel0().Refresh();
end-method;
method OnLineDeny
/+ &userstep as EOAW_CORE:ENGINE:UserStepInst +/
/+ Extends/implements EOAW_CORE:ApprovalEventHandler.OnLineDeny +/
Local string &as, &kov;
Local Record &poRecord;
Local EOAW_CORE:ApprovalManager &appMgr;
Local number &lineNbr;
/*—Line Approval—*/
&poRecord = CreateRecord(Record.SRM_M_AWE2_LINE);
&userstep.step.path.thread.SetAppKeys(&poRecord);
&as = &poRecord.ASSET_ID.Value;
&kov = &poRecord.GetField(Field.ITEMNAME).Value;
SQLExec("UPDATE PS_SRM_M_AWE2_LINE SET WF_STATUS = :1 WHERE ASSET_ID = :2 AND ITEMNAME = :3", "D", &as, &kov);
GetLevel0().Refresh();
end-method;
method OnAdHocInsert
/+ &stepinst as EOAW_CORE:ENGINE:AdHocStepInst, +/
/+ &approver as Array of String +/
/+ Extends/implements EOAW_CORE:ApprovalEventHandler.OnAdHocInsert +/
&stepinst.Save();
end-method;
Transaction Demo:

Adhoc Approvers
Adhoc approvers/reviewers are users that an approver or requester would like to review a transaction. Hence, we can add Adhoc user in the process for additional approver or review, which is shown below. Adhoc reviewers are notified and provided with a link in a worklist entry or email to the transaction, if the process is so configured.
In configuration transaction we have to add Adhoc user list.
